Hosted Model Deployment Further Instructions
In most cases, the normal deployment from the Hosted Model Deployment Guide is sufficient. However, some additional configuration is possible. This page outlines other ad-hoc actions that can be taken.
Manually Create App Registration
First create the App Registration on your Microsoft Entra ID Chose the tenant type as either "Single Tenant" or Multi Tenant" depending on whether the ProcessFactorial Portal will only be used by users internal to your organisation. Note the name of the App Registration for the next step.
The manually created App Registration needs the ProcessFactorial Portal url (with and without a trailing back slash) as redirect URLs. For example: https://npobpPARAM01portal.azurewebsites.net https://npobpPARAM01portal.azurewebsites.net/
Open the customerconfig.json, find the serviceAccounts section and update the name property to match the name of the App Registration you just created. Also set the "shouldCreateAccount" to false
 "serviceAccounts": [
    {
           "identifier": "executionEngineServiceAccount",
           "name": "APP REGISTRATION NAME HERE",
           "singleTenant": false,
           "endpoints": [
               "https://npobpPARAM01portal.azurewebsites.net/"
           ],
           "shouldCreateAccount": false,
           "enabled": true
    }
 ],
Single Tenant
If using a Single Tenant, only users within your own Microsoft Entra ID will be able to log on to the ProcessFactorial Portal In the customerconfig.json, find the portal front end function app (search for "portalfrontend"). Find and replace the placeholder values with this:
Note
Update {tenantid} with the Id of your Azure Tenant
 "configuration": {
    "PLACEHOLDER_VITE_API_BASE_URL_END": null,
    "PLACEHOLDER_VITE_WEB_BASE_URL_END": null,
    "PLACEHOLDER_VITE_REACT_APP_AAD_APP_CLIENT_ID": null,
    "PLACEHOLDER_VITE_REACT_APP_AAD_APP_TENANT_ID": null,
    "PLACEHOLDER_VITE_REACT_APP_AAD_APP_REDIRECT_URI": "/",
    "PLACEHOLDER_VITE_REACT_APP_AAD_APP_FUNCTION_SCOPE_URI": "/",
    "PLACEHOLDER_VITE_REACT_APP_AAD_APP_AUTHORITY_DOMAIN": "login.microsoftonline.com",
    "PLACEHOLDER_VITE_REACT_APP_AAD_APP_AUTHORITY_BASE_URL": "https://login.microsoftonline.com/{tenantid}",
    "PLACEHOLDER_VITE_REACT_APP_AAD_APP_AUTHORITY_SIGNUP_SIGNIN": "",
    "PLACEHOLDER_VITE_REACT_APP_AAD_APP_AUTHORITY_FORGOT_PASSWORD": "",
    "PLACEHOLDER_VITE_REACT_APP_AAD_APP_AUTHORITY_PROFILE_EDIT": ""
},
Multi Tenant
If using a Multi Tenant, usersfrom any Microsoft Entra ID will be able to log on to the ProcessFactorial Portal, but you will be able to secure exactly which tenants via APIM policies and the ProcessFactorial product . In the customerconfig.json, find the portal front end function app (search for "portalfrontend"). Find and replace the placeholder values with this:
 "configuration": {
    "PLACEHOLDER_VITE_API_BASE_URL_END": null,
    "PLACEHOLDER_VITE_WEB_BASE_URL_END": null,
    "PLACEHOLDER_VITE_REACT_APP_AAD_APP_CLIENT_ID": null,
    "PLACEHOLDER_VITE_REACT_APP_AAD_APP_TENANT_ID": null,
    "PLACEHOLDER_VITE_REACT_APP_AAD_APP_REDIRECT_URI": "/",
    "PLACEHOLDER_VITE_REACT_APP_AAD_APP_FUNCTION_SCOPE_URI": "/",
    "PLACEHOLDER_VITE_REACT_APP_AAD_APP_AUTHORITY_DOMAIN": "login.microsoftonline.com",
    "PLACEHOLDER_VITE_REACT_APP_AAD_APP_AUTHORITY_BASE_URL": "https://login.microsoftonline.com/common",
    "PLACEHOLDER_VITE_REACT_APP_AAD_APP_AUTHORITY_SIGNUP_SIGNIN": "",
    "PLACEHOLDER_VITE_REACT_APP_AAD_APP_AUTHORITY_FORGOT_PASSWORD": "",
    "PLACEHOLDER_VITE_REACT_APP_AAD_APP_AUTHORITY_PROFILE_EDIT": ""
},
Update Initial NPO Settings
After thew first deployment completes, we need to set up the base portal URL
Warning
The NPOSettings table is cached on the portal. So the setting below may take up to 5 minutes to take effect
To do this:
1. Find the NPO Portal (npobp_portal) Azure component and copy the URL (or the custom domain URL)
2. Access the master (Data Store - Master (npobp_mast)) storage account. If this is in an Azure Storage Account, a tool like Microsoft Azure Storage Explorer will allow you to connect to it.
3. Find the NPOSettings table and update the BasePortalUrl to the value from the NPO Portal (npobp_portal) above. Ensure that it is a propertly formed URL, e.g. https://myportal.azurewebsites.net/.
4. Save
Enable Auth Issuer
The very first time the deployment happens, we need to enable the ability to accept a new Supported Issuer
Caution
Do not leave the AllowNewUserAuthSupportedIssuers set to true beyond adding a new Supported Issuer In this state, anyone with a valid Microsoft Entra ID can access your system. Note that they won't have access to your configuration data though, but they will be able to configure their own processes
Warning
The NPOSettings table is cached on the portal. So the setting below may take up to 5 minutes to take effect
To do this:
1. Access the master (Data Store - Master (npobp_mast)) storage account. If this is in an Azure Storage Account, a tool like Microsoft Azure Storage Explorer will allow you to connect to it.
2. Find the NPOSettings table and update the AllowNewUserAuthSupportedIssuers to true.
3. Now access the portal and log in for the first time. This will create the requires records in the master tables.
4. Finally, update the AllowNewUserAuthSupportedIssuers back to false.
Note
If additional issuers are needed, the above steps can be executed again, but with a login from the alternate Supported Issuer
VNETs, Subnets and NSG Rules
This section lists the Virtual Networks (VNETs), their subnets, and the Network Security Group (NSG) rules required by the platform. In most situations, these are deployed as part of the deployment pipeline. However, some customers may have specific network requirements, like using existing VNETs or subnets.
These settings are recommended configuration only. Any specific network requirements by the customer can override these.
Note
The IP Address below of 10.0.0.x/xx are an example only. Although we generally recommend the size of the subnets as per below (e.g. /27) to allow for scaling.
VNET
| Identifier | Enabled | Resource Group | Address Prefix |
|---|---|---|---|
| CUSTOMER-vnet | true | core | 10.0.0.0/24 |
Subnets
| Identifier | Name | Prefix | NSG Identifier | Service Endpoints | Subnet Delegation |
|---|---|---|---|---|---|
| subnet-config | CUSTOMER-sn-config | 10.0.0.0/27 | nsgconfig | Microsoft.Storage, Microsoft.AzureCosmosDB, Microsoft.KeyVault, Microsoft.Web | Microsoft.Web/serverFarms |
| subnet-exec | CUSTOMER-sn-exec | 10.0.0.32/27 | nsgexec | Microsoft.Storage, Microsoft.AzureCosmosDB, Microsoft.KeyVault, Microsoft.Web | Microsoft.Web/serverFarms |
| subnet-portal | CUSTOMER-sn-portal | 10.0.0.64/27 | nsgportal | (none) | Microsoft.Web/serverFarms |
| subnet-python | CUSTOMER-sn-python | 10.0.0.96/27 | nsgpyhton | Microsoft.Web, Microsoft.Storage | Microsoft.App/environments |
| subnet-translation | CUSTOMER-sn-translation | 10.0.0.128/27 | nsgtranslation | Microsoft.Storage, Microsoft.Web | Microsoft.Web/serverFarms |
| subnet-apim | CUSTOMER-sn-apim | 10.0.0.160/27 | nsgapim | (none) | (must be empty for APIM) |
| subnet-privatelink | CUSTOMER-sn-privatelink | 10.0.0.192/27 | nsgprivatelink | (none) | (none) |
Network Security Groups (NSGs)
The inbound/outbound rule entries include a rule name followed by fields in parentheses. Meaning of fields:
priority: Numeric priority; lower numbers have higher precedence.Allow/Deny: Action the rule takes (Allow or Deny).Inbound/Outbound: Rule direction.protocol(e.g.,Tcp,Udp,*): Network protocol for the rule.dst/dstPorts/dstPorts:...: Destination port or port range the rule applies to.src/srcAddr/srcPorts: Source address or port(s). Service tags appear as names (e.g.,AzureLoadBalancer,ApiManagement,ServiceBus,Storage,AzureKeyvault,AzureActiveDirectory,AzureMonitor,Sql,AzureCosmosDB,PowerPlatformInfra).*means any.description: Optional human-readable note about the rule (when present).
Examples from the table:
AllowAzureMonitorOutbound (priority 510, Allow, Outbound, Tcp, dst:443)→ priority 510, Allow outbound TCP traffic to destination port 443 (Azure Monitor service tag used where shown).AllowMongoDBOutbound (priority 530, Allow, Outbound, Tcp, dst:10255)→ Allow outbound TCP to port 10255 (Cosmos DB Mongo endpoint).AllowAzureLoadBalancer-Inbound (100, Inbound, Tcp, dst:6390, src:AzureLoadBalancer)→ Allow inbound TCP traffic to port 6390 from AzureLoadBalancer service tag.
| Identifier | Name | Inbound Rules | Outbound Rules |
|---|---|---|---|
| nsgconfig | CUSTOMER-nsg-subnet-config | AllowAzureMonitorOutbound (priority 510, Allow, Outbound, Tcp, dstPorts:443, srcAddr:*, dstAddr:AzureMonitor) | AllowAzureMonitorOutbound (510, Tcp, dst:443) AllowServiceBusOutbound (520, Tcp) AllowMongoDBOutbound (530, Tcp, dst:10255) AllowKeyvaultOutbound (540, Tcp, dst:443) AllowAADOutbound (550, Tcp, dst:443) AllowStorageOutbound (560, Tcp, dst:443,445) DenyAnyCustomInternetOutbound (1000, Deny) |
| nsgexec | CUSTOMER-nsg-subnet-exec | (none) | AllowAzureMonitorOutbound (510, Tcp, dst:443) AllowServiceBusOutbound (520, Tcp) AllowMongoDBOutbound (530, Tcp, dst:10255) AllowKeyvaultOutbound (540, Tcp, dst:443) AllowAADOutbound (550, Tcp, dst:443) AllowStorageOutbound (560, Tcp, dst:443,445) DenyAnyCustomInternetOutbound (1000, Deny) |
| nsgportal | CUSTOMER-nsg-subnet-portal | (none) | AllowAzureMonitorOutbound (510, Tcp, dst:443) DenyAnyCustomInternetOutbound (1000, Deny) |
| nsgpyhton | CUSTOMER-nsg-subnet-python | (none) | AllowAzureMonitorOutbound (510, Tcp, dst:443) AllowStorageOutbound (560, Tcp, dst:443,445) DenyAnyCustomInternetOutbound (1000, Deny) |
| nsgtranslation | CUSTOMER-nsg-subnet-translation | (none) | AllowPowerAppsOutbound (500, Tcp, dst:443) AllowAzureMonitorOutbound (510, Tcp, dst:443) AllowServiceBusOutbound (520, Tcp) AllowMongoDBOutbound (530, Tcp, dst:10255) AllowKeyvaultOutbound (540, Tcp, dst:443) AllowAADOutbound (550, Tcp, dst:443) AllowStorageOutbound (560, Tcp, dst:443,445) DenyAnyCustomInternetOutbound (1000, Deny) |
| nsgapim | CUSTOMER-nsg-subnet-apim | AllowAzureLoadBalancer-Inbound (100, Inbound, Tcp, dst:6390, src:AzureLoadBalancer) Allow-ApiManagement-Inbound-3443 (110, Inbound, Tcp, dst:3443, src:ApiManagement) |
Allow-APIM-Outbound-HTTP (200, Outbound, Tcp, dst:80) Allow-APIM-Outbound-HTTPS (210, Outbound, Tcp, dst:443) Allow-APIM-Outbound-Storage (220, Outbound, Tcp, dst:443) Allow-APIM-Outbound-KeyVault (230, Outbound, Tcp, dst:443) Allow-APIM-Outbound-SQL (240, Outbound, Tcp, dst:1433) Allow-APIM-Outbound-AzureMonitor (250, Outbound, Tcp, dst:443) Allow-APIM-Outbound-AAD (260, Outbound, Tcp, dst:443) DenyAnyCustomInternetOutbound (1000, Deny) |
Changing settings
Some settings in the customerconfig.json require components to be manually deleted on the Azure instance in order for them to be recreated via the deployment script.
Note
Most of the settings below can safely be done directly in Azure (such as updating CORS).
However, maintaining the deployment script as a master copy, instead, makes disaster recovery much easier. Effectively, all the components can be recreated by re-running the script in an emergency. After that, only the data stores may need to be migrated, re-linked or restored from backup
Using a different App Registration
If you want to use a different App Registration, the following needs to happen:
- Update the name in the serviceAccount section to the name of the App Registration (if it does not exist, it may be auto-created based on the shouldCreateAccount setting)
"serviceAccounts": [ { "description": "If shouldCreateAccount is true, will create service account on AAD. User will need permissions to create arr registrations. If it is false, it is assumed that the App Registration was created outside of this script. If created outside this scruipt, the name should still be provided because it is used for auth, e.g. on the Portal front end", "identifier": "executionEngineServiceAccount", "name": "[YOUR APP REGISTRATION DISPLAY NAME]", "singleTenant": false, "endpoints": [ "*" ], "shouldCreateAccount": false, "enabled": true } ], - Delete the following Azure components
- Rerun the deployment script
Updating CORS on an App
You can update CORS on the following components so that CORS takes effect automatically on deployment:
- Portal Backend (npobp_portalbackend)
- Custom Functions Function App (npobp_common)
- NPO Portal (npobp_portal)
- Config Function App (npobp_config)
- Translation Layer - Dataverse (npobp_trdataverse)
- Translation Layer SQL (npobp_trsql)
- Translation Layer SFDC (npobp_trsfdc)
- Master Maintenance Service (npobp_mastmaint)
- Execution Engine (npobp_exec)
-
Update the CORS in the customerconfig.json file.
- Delete the Azure component
- Rerun the deployment script
Updating Policy on APIM
If you want to update the policies for any APIM API, you can do the following
- Update the policy in the customerconfig.json file.
- If the same version of APIM is being deployed, also update the
Named Valuewithin APIM calledpackage_versionotherwise the APIM deployment will be skipped. Update the value to anything else, so long as it is non-empty - Rerun the deployment script
Add Platform Admin Users
Platform admin users have the following special platform permissions: - They can add new customers if NPOSettings.AllowCustomerCreate = AdminOnly
Note
These users will be authenticated via the same process as other non-admin users prior to allowing them additional permissions.
To add one or more Platform Admin Users:
1. In the Azure Portal, browse to the Data Store - Master (npobp_mast) storage account
2. Select Storage Browser -> Storage Browser -> NPOSettings
1. Find or Add the property called PlatformAdmins
2. Add the semi-colon sepearated list of user emails and service principals (app registration Ids) as the value
1. For example c0bd469d-de06-4bea-864f-19c00038faaa;john@example.com;jane@example.com
3. Save
Note
All NPO Settings are cached for up to 5 minutes, so please wait a little while for these changes to take effect.
Configure Portal Backend Proxy (Portal Backend (npobp_portalbackend))
All traffic that originates external to the platform (for example via the internet facing portal) is routed through the Portal Backend (npobp_portalbackend) before it is passed on to APIM.
In this example, we only have one Portal Backend (npobp_portalbackend) for all interactions. It is possible to host multiple instances of the Portal Backend (npobp_portalbackend), each with it's own target downstream APIs.
To configure the Portal Backend (npobp_portalbackend) to accept apis: 1. Browse to the Portal Backend (npobp_portalbackend) in Azure Portal 2. Go to Settings -> Environment Variables 1. Create or add the following settings: 1. VALID_INPUT_PATHS 2. API_KEY_VALUES
The values in these settings are logically linked by index. The first value in VALID_INPUT_PATHS uses the first setting in API_KEY_VALUES as it's API Key
To find the VALID_INPUT_PATHS and API_KEY_VALUES:
1. Browse to the APIM (npobp_apim) instance in Azure Portal
2. Select APIs -> APIs. Each of the values in VALID_INPUT_PATHS is represented as the API URL Suffix of the APIs listed on this screen (with a leading / . Note that this is different to the display name. These are the standard APIs
1. /api
2. /testharnessapi
3. /demapi

- Select APIs -> Subscriptions. Each of the above APIs will have a corresponding subscription here
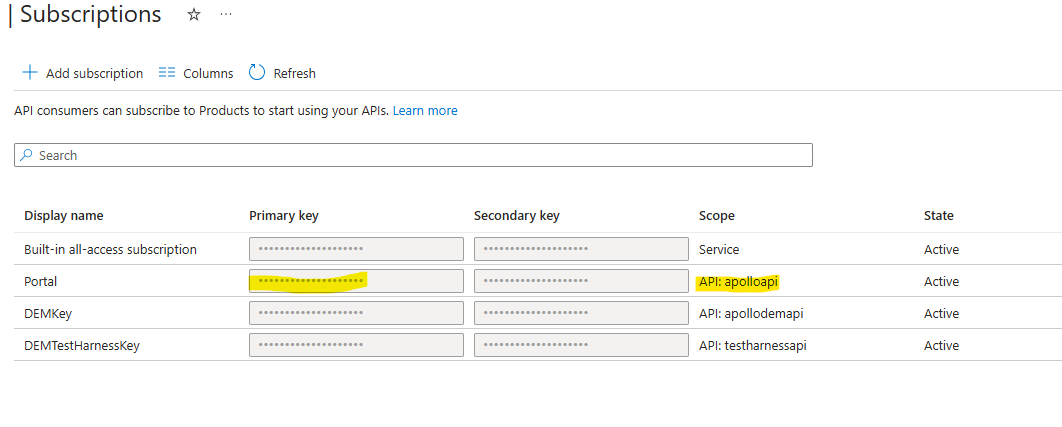
Construct the semi-colon list of VALID_INPUT_PATHS and API_KEY_VALUES and update the values on the Portal Backend (npobp_portalbackend)
For example:
| Environment Variable | Value | Comment |
|---|---|---|
| VALID_INPUT_PATHS | /api;/testharnessapi;/demapi | In most installs, this value will be exactly as in this example. Only when more than one instance of the Portal Backend (npobp_portalbackend) are installed, will this vary |
| API_KEY_VALUES | 6f56dc45-8879-41b3-b267-4d19136caaaa;d32109d4-332f-4924-a7e8-eda28601aaaa;068d31be-2e9c-406d-8402-364b6fdbaaaa | Pay particular attention to the order of these values because the values in the VALID_INPUT_PATHS and the keys in the API_KEY_VALUES value needs to match the order |
Configure Translation Layer
Update Storage Configuration
The configuration backend needs to know the URL of the particular translation layer (Translation Layer - Dataverse (npobp_trdataverse), Translation Layer SQL (npobp_trsql), etc).
Note
There may be more than one translation record in this table. Only the ones that you intend to use needs to be configured. The rest can be ignored.
- In the Azure Portal, browse to the Data Store - Master (npobp_mast) storage account
- Select Storage Browser -> Storage Browser -> TechStack
- For each one that you intend to use, update the URLs with the URLs in the table below. All the values can be found directly on the relevant Azure components that was installed with the platform
| Property Name | Default Value | Example New Value | Comment |
|---|---|---|---|
| BaseExternalFormsUrl | Default_BaseExternalFormsUrl | https://mynpoportalbackend.azurewebsites.net | The URL that the external forms will attempt to access. This will typically be your Portal Backend (npobp_portalbackend) base URL and will be the same for every record. The external forms are those hosted on your public website or portal, such as Power Pages, Wix or a custom React App |
| BaseTestHarnessUrl | Default_BaseTestHarnessUrl | https://mynpoportalbackend.azurewebsites.net | The URL that the NPO Portal (npobp_portal) Forms test page will attempt to access when testing forms. This will typically be your Portal Backend (npobp_portalbackend) base URL and will be the same for every record. |
| BaseUrl | Default_BaseUrl | https://mynpotrdataverse.azurewebsites.net | This is the base URL of the translation layer, e.g. that of Translation Layer - Dataverse (npobp_trdataverse), Translation Layer SQL (npobp_trsql), etc. This will be different for every record. |
| BaseUrlMaster | Default_BaseUrlMaster | https://mynpoapim.azure-api.net | This is the base URL of your APIM (npobp_apim) instance and will be the same for every record |
| BaseUrlNPOFunctions | Default_BaseUrlNPOFunctions | https://mynpocommon.azurewebsites.net/api | This is the base URL of your Custom Functions Function App (npobp_common) instance and will be the same for every record |
| DEMSubscriptionKey | Default_DEMSubscriptionKey | Same value as the DEMKey from #Configure Portal Backend Proxy ( Portal Backend (npobp_portalbackend)) | This is used to generate the token for the external forms |
| DEMTestHarnessSubscriptionKey | Default_DEMTestHarnessSubscriptionKey | Same value as the DEMTestHarnessKey from #Configure Portal Backend Proxy ( Portal Backend (npobp_portalbackend)) | This is used to generate the token for the internal test form |
We also need to update the function key secrets in the KeyVault (npobp_keyvault): |
Update Translation Layer Key
- In the Azure Portal, browse to the relevant translation layer function app
- Go to Functions -> App Keys and copy the Host Key value called
npo-azure-functions
- Go to Functions -> App Keys and copy the Host Key value called
- In the Azure Portal, browse to the KeyVault (npobp_keyvault)
- Go to Secrets and find the secret with the following naming convention:
techstackfunctionkey-translation-[TECHSTACKID](whereTECHSTACKIDisdataverse001,sqlserver001, etc.) - Replace the secret value with the Host Key value
- Go to Secrets and find the secret with the following naming convention:
Update Common Functions Key
- In the Azure Portal, browse to the Custom Functions Function App (npobp_common)
- Go to Functions -> App Keys and copy the Host Key value called
npo-azure-functions
- Go to Functions -> App Keys and copy the Host Key value called
- In the Azure Portal, browse to the KeyVault (npobp_keyvault)
- Go to Secrets and find the secret with the following naming convention:
techstackfunctionkey-npofunction-[TECHSTACKID](whereTECHSTACKIDisdataverse001,sqlserver001, etc.) - Replace the secret value with the Host Key value
- Go to Secrets and find the secret with the following naming convention: